How To Take a Good Passport Photo At Home?
If you need a biometric photo for your passport or visa application, waiting in line for a professional photographer is unnecessary. Progress is not standing still: taking a high-quality picture on an ordinary smartphone is possible, and a specialized passport photo app will help you format the image to meet the official requirements.
Table of contents
- Step 1: Check the official passport photo requirements
- Step 2: Set up proper lighting for taking a passport photo at home
- Step 3: Appropriate look
- Step 4: Background
- Step 5: How to take a passport photo with a phone?
- Step 6: Instantly edit your passport photo online
- Step 7: Passport photo quality check and enhancement
- Step 8: How do I print passport-size photos at home?
- FAQ
Let us tell you how to take a passport-quality photo at home in a few simple steps!
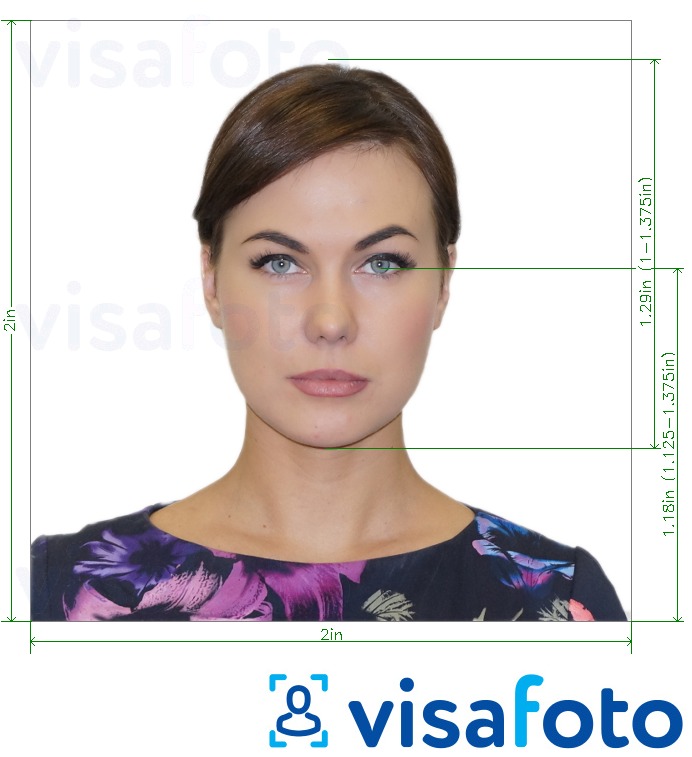
Step 1: Checking the official passport photo requirements
It is essential to remember that different documents have different requirements for the photo, so it’s best to check them in advance. Requirements can vary depending on the country, document type, and even the application method (online or in person). For example, official IDs like passports and visas usually require a neutral facial expression, while other documents, such as student cards or ISIC, may allow a slight smile.
In addition to facial expression, authorities often specify strict rules for photo size, background color, head position, lighting, and image quality. For instance, the USA passport photo requirements prohibit wearing glasses, even for medical reasons, and require a plain white or off-white background with no shadows. Head coverings are only allowed for religious or medical purposes, and must not obscure facial features.
To avoid rejection or delays, it’s important to follow these rules precisely. You can easily check the exact specifications for your document by selecting it in our database, where all parameters are clearly listed and regularly updated.
Step 2: Setting up proper illumination
You should take your passport photo in good light, without distinct shadows or glare. Daylight is best for this purpose. If you have access to a window with natural light, try taking your passport photo nearby, as it can provide a soft, even illumination that is very flattering.
Artificial light, on the other hand, must come from several sources.
Some tips on preparing the perfect light for the passport picture:
- Find a well-lit area: Look for a spot in your house with plenty of natural light or a room with bright artificial light. If you have such a space, you can skip the rest of the recommendations: the picture will be well-lit anyway.
- The sun's rays should not fall on your face: The light source should be in front of you. Any deflection will create unnecessary shadows, so if the window is at the side, it’s better to cover it with a curtain.
- Place two lights: If there is not enough daylight in your room, place two lights on either side of you, angled slightly towards the center of your face. You can use desk lamps if they are bright enough for illumination.
- Avoid using overhead lighting: it can create shadows and an unflattering look.
- Adjust the brightness and positioning of the lights: Test different lighting setups by taking a few test shots until you achieve even lighting without harsh shadows.
- Use a white balance card (if you are a perfectionist): it can help you achieve accurate color representation in your shot. You can purchase one online or make one at home by printing a white paper.
Step 3: Preparing appropriate look
Practice monitoring your facial expressions in front of the mirror. During your passport photo session, it is essential not to press your lips together, twist your mouth, close your eyes, frown, or make unnatural expressions.
Also, rehearse your posture. To take a good passport picture, you should look straight ahead, not too much chin tucked in. Keep your shoulders level.
Answering the popular question "What to wear for a passport photo," we recommend you choose classic clothing in a business or casual style. It is worth abandoning the "fashionable," too-prominent things. Fashions pass, and the passport will be with you for a long time.
Some essential tips on how to look good in a passport-style portrait are as follows:
- Choose the right outfit: Wear simple and plain clothing with no patterns or graphics. Stick to a color that complements your skin tone and hair color. Avoid wearing anything too flashy or distracting;
- Style your hair: Choose a hairstyle that is neat and tidy, with no stray hairs or flyaways. Keep your hair away from your forehead so that your entire face, including your forehead and ears, is visible in the photo;
- Apply minimal makeup, if any: Avoid using heavy foundation or bright, bold lipstick. Use makeup to enhance your natural features rather than masking them;
- Get enough rest: Get enough rest the night before taking a picture so that you look fresh and alert;
- Smile with your eyes: Even though you should avoid smiling with your mouth in an ID photo, you can still smile with your eyes. Think happy thoughts and try to convey a sense of warmth and friendliness in your eyes;
- And most importantly: take your photo in a good mood, as it will improve any picture.
Step 4: Adjusting the background
If you use Visafoto to edit your passport photo, skip this point: absolutely any background will work for you.
If you prefer to process the picture yourself, prepare a white or off-white sheet of paper or poster board large enough to cover the area behind you. You can tape it to the wall or drape it over a chair or other surface to create a smooth, even backdrop.
Sheets and curtains are worse since they almost always have noticeable creases.
Regardless of your choice, ensure the background is smooth and free of wrinkles or blemishes. Also, check if it is well-lit and evenly illuminated, with no shadows or dark spots.
If you get shadows behind you, you can remove them later in Photoshop or any photo editing app with an eraser.
Step 5: How to take a passport photo with a phone?
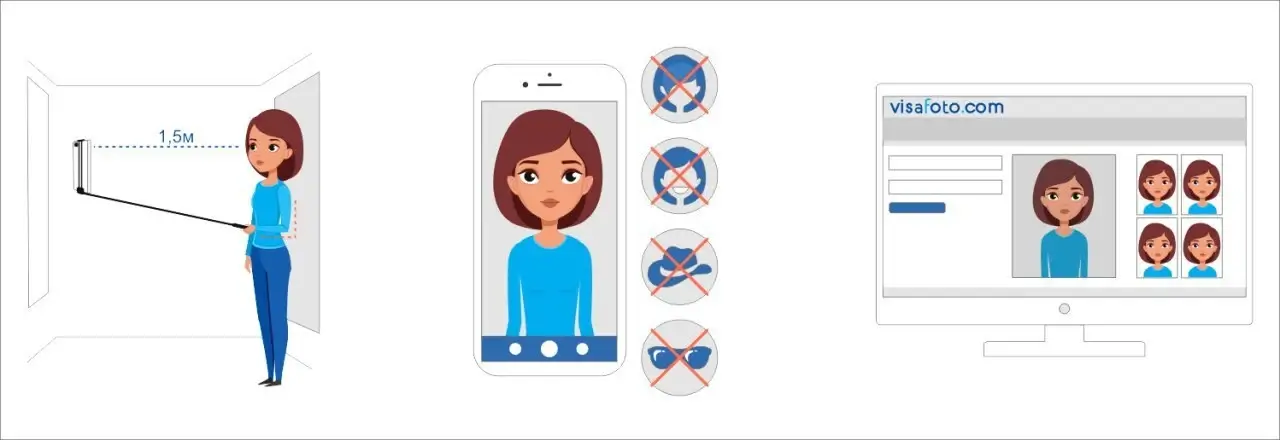
Today's smartphones can replace professional cameras in terms of image quality. To get the best passport picture possible, just follow the rules below:
- The camera should be 1.5-2 meters (5-7 feet) away from you, at eye level. Shooting at a closer range will not get the upper torso into the frame, and shooting from afar may not get a sharp enough view of your face;
- Use the back camera, not the frontal one. The back camera generally has a higher resolution and better image quality;
- Clean your lens: Make sure the lens of your phone's camera is clean and free of smudges or fingerprints. This way, your picture will be clear and sharp;
- Using a selfie stick to take pictures, ensure your shoulders remain level. Hold the selfie stick with your arm bent, not outstretched;
- If you use a selfie stick to take pictures, make sure your shoulders remain level. Hold the selfie stick with your arm bent, not outstretched;
- If you don't have anyone to take a photo of you, use a tripod. The tripod can be replaced by furniture, a stack of books, or any other horizontal surface;
- Use the timer: Most phones have a timer function to set a delay between pressing the shutter button and taking the photo. Use this function to ensure that your hand is not visible in the photo;
- Keep your face neutral: Avoid smiling, frowning, or facial expressions. Your look should be relaxed and expressionless;
- Hold your shoulders level: Make sure your shoulders are level and your back is straight;
- Take several pictures to choose the best one.
Step 6: Instantly edit your passport photo online
You can instantly take a passport-size photo by yourself with our online tool. Simply upload your image here, select the document you need, and the picture is ready! Visafoto will remove the background and set the required size and format. You only need to download the file and proceed with the passport or visa application.
Source

Result
Visafoto has specialized in creating passport and visa photos since 2013. We know the requirements for all documents worldwide, and hundreds of thousands of customers have successfully applied for passports and visas thanks to our service.
Step 7: Passport photo quality check and enhancment
Visafoto does more than simply format your passport photo to the required size. The system automatically checks the technical quality of every uploaded image and applies corrections whenever needed.
If your original photo has uneven lighting, shadows on the face or background, low resolution, blur, or framing issues, Visafoto can automatically improve it within seconds. This includes enhancing scanned photos, restoring clarity and detail, correcting exposure, and adjusting composition to meet official biometric standards.
If the original framing is too tight or the photo does not match the required format, Visafoto can also reformat the image and extend missing areas, such as clothing edges, to produce a fully compliant result ready for printing or online submission.
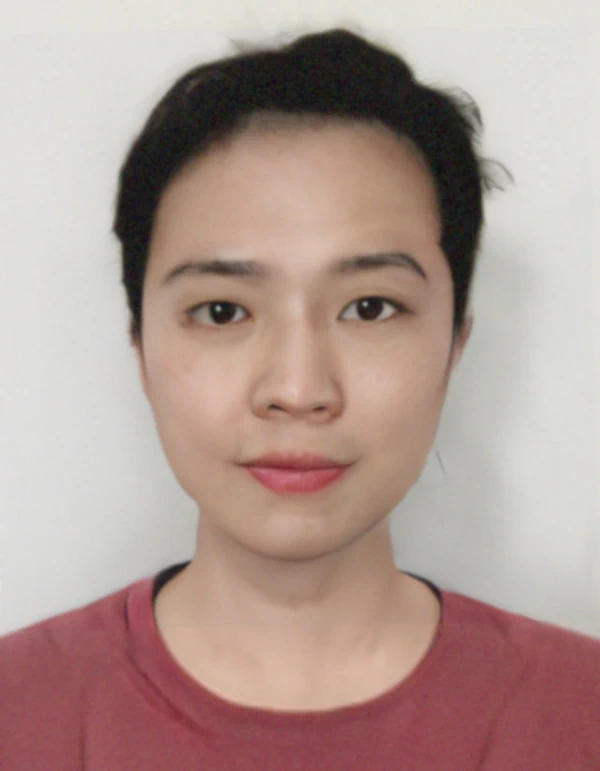
Before: A low-resolution scan, cropped too closely.

After: Clarity improved, and shoulders extended to meet official standards. Note: the result is a 2x2 inch US visa or passport photo.
Step 8: Printing passport-size photos at home (if needed)
Use a color printer to print passport photos on heavyweight photo paper. Make sure that the photos are set to the right size. Visafoto takes care of everything beforehand: you will receive a template with four individual photos corresponding to the required format. You can print the template at home or at your nearest copy center or pharmacy. For example, this guideline explaines how to print a U.S. passport photo for less than $0.50.
FAQ
Can I use a passport photo taken with a low-resolution camera or an old phone?
Yes, as long as the image still meets the minimum standards for resolution and clarity. Facial features must be sharp and clearly visible, without pixelation or blur. If the quality is too low, Visafoto can automatically enhance the image online within seconds, improving resolution and overall clarity to meet biometric requirements.
What happens if my passport photo is rejected after submission?
If your photo does not meet biometric standards, the embassy or passport office will usually reject the application or ask you to submit a new one. If you ordered your photo through Visafoto and it is rejected by the authorities, we provide a full refund under our money-back guarantee.
Are selfies allowed for official photos?
Yes, but only if they follow the same technical rules as professionally taken studio photos. This means a neutral expression, correct head size and positioning, even lighting with no shadows, a plain background, and no visible fingers, phone edges, or selfie stick in the frame.
Can I use an old passport photo for a new visa or ID?
Usually not. Most authorities require a recent photo, often taken within the last six months, so it accurately reflects your current appearance. While some older photos may still be accepted if your appearance has not changed, using one increases the risk of rejection or additional verification checks.
Last update: April 2026