UPSC Portal Guidelines: How to Pass Your Examination to Become a Civil Servant in India
Do you want to become a civil servant in India? To achieve this, you will need to prepare your documents, submit an online form, and pass two stages of examination. Each part requires careful attention and has its own challenges to overcome. The Indian government has created the UPSC portal for candidates to submit their application forms. Let’s discuss the paperwork involved in this process and how to prepare your photo and signature for your examination.
Table of contents
- Civil Services Examination in India
- How to apply for UPSC Examinations?
- What photo do you need for your UPSC form?
- Your electronic signature is an indispensable part of your examination form
- How to create a signature file for UPSC? Use the 7ID: digital signature & ID photo app
- Get your UPSC photo online using Visafoto.com
- Take your UPSC photo with a phone
- How to upload your Photo and Signature to your UPCS form
Civil Services Examination in India
Do you want to work in the police, in the post, in defense, in railway or in the revenue service? If you plan working there, you will need to pass the Civil Service Examination. Jobs in the Indian civil service are complicated to get as it takes a year or two to pass the examination and there are plenty of other candidates. There are 32 hours of examination in total.
Here is the full list of the services in which you can get a job after the examination:
- All India services
- Indian Administrative Service (IAS)
- Indian Police Service (IPS)
- Central Civil services (Group A)
- Indian Foreign Service (IFS)
- Indian Audit and Accounts Service (IA&AS)
- Indian Civil Accounts Service (ICAS)
- Indian Corporate Law Service (ICLS)
- Indian Defence Accounts Service (IDAS)
- Indian Defence Estates Service (IDES)
- Indian Information Service (IIS)
- Indian Postal Service (IPoS)
- Indian P&T Accounts and Finance Service (IP&TAFS)
- Indian Railway Protection Force Service (IRPFS)
- Indian Revenue Service (IRS-IT)
- Indian Revenue Service (IRS-C&CE)
- Indian Trade Service (ITrS)
- Indian Railway Management Service (IRMS)
- Central Civil Services (Group B)
- Armed Forces Headquarters Civil Services (AFHCS)
- Delhi, Andaman and Nicobar Islands Civil Service (DANICS)
- Delhi, Andaman and Nicobar Islands Police Service (DANIPS)
- Pondicherry Civil Service (PCS)
- Pondicherry Police Service (PPS)
Here is the approximate annual calendar of the examinations:
- Stage I: Preliminary Examination that is held in June. Results are announced in August. There are 2 multiple-choice tests, the first one is for general Studies, and the second one is the Civil Service Aptitude Test.
- Stage II: Mains
- Examination is held in October. Results are announced in January. You write nine essays.
- Personality Test (interview) is held in March. Final results are usually announced in May.
- Successful candidates begin their training program in September after passing the medical examination and some other formalities.
How to apply for UPSC Examinations?
How to start your challenging journey to civil service?
You can submit your application form only online. You have 3 weeks to fill in your form. The questions are in Hindi and English.
You don’t have to pay for your application if you are a woman, have Benchmark Disabilities or belong to the Scheduled Caste and Scheduled Tribe.
You are not allowed to submit several forms at once, but if you did, the Commision will only accept the last application. All previous forms will be ignored.
There are two parts of the form.
Part I consists of personal details like
- name
- father’s/mother’s name
- date of birth
- address
- education,
- age relaxation,
- scribe details
- preferences of particular Examination
- number of Photo ID Card
For Part II you do these steps
- Pay for the examination unless you are exempted from the fee
- Choose Centre of Examination
- Uploading of photo, signature and photo ID.
- Agree to the declaration.
After completing all these steps, you become a candidate for the Examination. You do not fill in the PART-II, you will not be registered. Even if you pay for the examination, but you don’t upload your photo or signature or you don’t choose the center, your application will be incomplete.
At the end, check your filled information. Then press the Submit button. Remember that once you submit your online form, no changes will be allowed in the future.
What photo do you need for your UPSC form?
UPSC photo requirements are the following:
- Your photo must be clearly identifiable and visible
- The photo can be in Black&White or it can be in colour as long as they have a good quality
- Your photo must be a JPG file
- The file size is between 20 kb and 300 kb
- The required UPSC photo size is at least 350x350 pixels to 1000x1000 pixels. It should be a square image
- Bit depth of the image file is 24 bit.
- Images that are photos of already printed photos are unacceptable
- Your photo must be recent
In case your photo does not have proper pixel size or file format, just convert it using appropriate tools. UPSC allows you to do that!
Do you have trouble uploading your photo? Check its properties! If they are OK, your photo will upload easily.
Here is an example of the required photo:
Your electronic signature is an indispensable part of your examination form
So here are the detailed UPSC signature requirements:
- JPG format
- In black & white or in a colour
- The digital size of file should not exceed 300 KB each and must not be less than 20 KB
- Minimum resolution of the file should be 350 pixels (Width) X 350 pixels (Height) and maximum 1000 pixels (Width) X 1000 pixels (Height)
- Bit depth of image file should be 24 bit
- Quality of signature is good enough to be identifiable
- Signature must be clearly discernible
Overall, the requirements for photo and signature files are the same.
After creating a file that meets these requirements, it is time to upload to your form. How to do it?
How to create a signature file for UPSC? Use the 7ID: digital signature & ID photo app
UPSC allows you to convert your signature if it does have the correct size or file format.
So how do you get your digital signature file?
So here are the steps:
- Write your signature on a list of paper
- Take a photo of it
- Download the 7ID app
- Open the Signatures: for PDF documents and online applications section
- Press the New Signature button
- Choose your prepared photo from the gallery
- Then choose India signature for UPCS 350x350 pixels
- Press the get signature file button
- Then save the ready file to the galley or send it to your email address
- The only thing left is uploading the photo to the UPSC website.
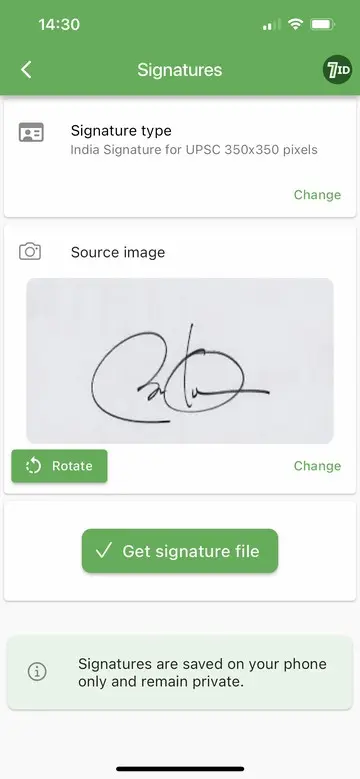
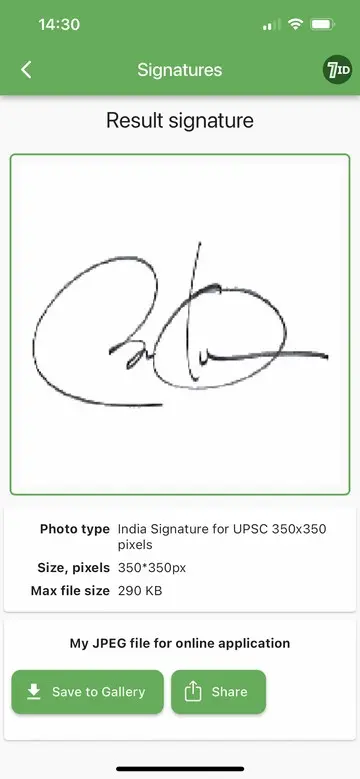
So how to get your signature with ease? Just download the 7ID app from GooglePlay or iOS. Just in seconds and without manual resizing you will get a digital file of your signature that meets all the requirements of the UPSC form.
Get your UPSC photo online using Visafoto.com
With Visafoto editor, you can instantly convert your photo to the required UPSC format.
Please follow this instruction:
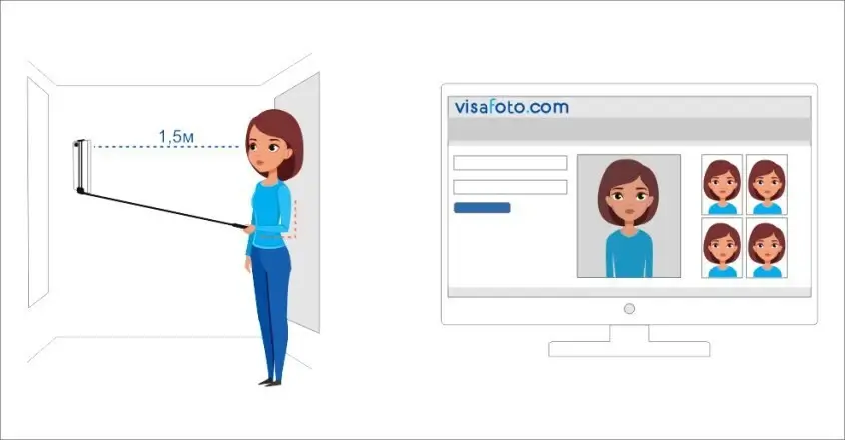
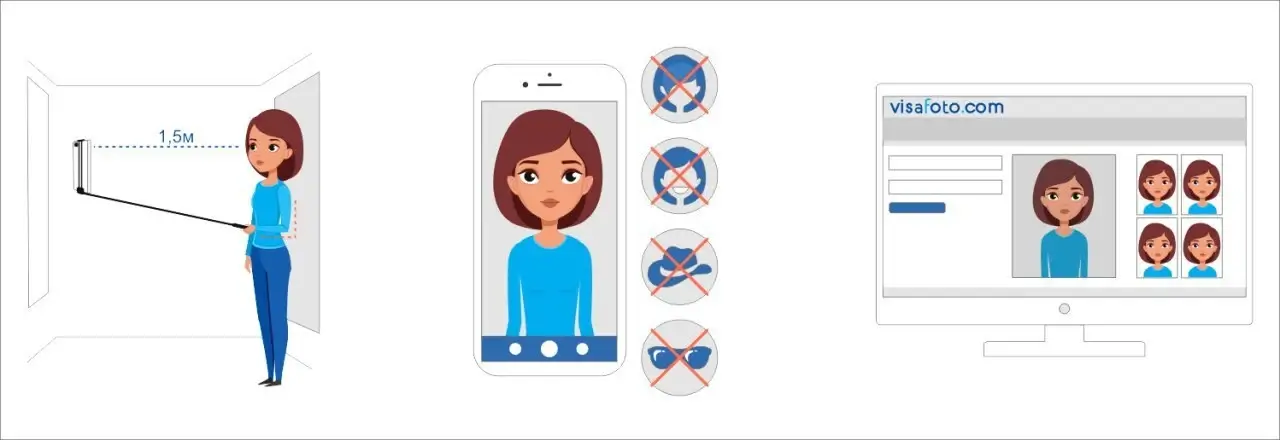
- Take a selfie under daylight when you stand opposite the sun window. Make sure that your face is evenly lit, your ears are seen, your eyes are open and not in shadows, hair does not cover the face, and there are enough shoulders in the picture.
- Upload your photo to https://visafoto.com/in-upsc-350x350-to-1000x1000-pixels-photo. Visafoto will instantly edit the background, the size and the format of the image.
- After payment, download your photo
- Still have doubts about the image quality? Do not hesitate to contact our support team at support@visafoto.com.
Create your own perfect ID photo at home. You will need only your smartphone, and no manual work is required from your side. Download the 7ID app or upload your photo to the Visafoto.com website and your photo will be ready in 2 seconds.
Let’s look at some examples. First, take a selfie under daylight:

And you will get photos for printing and online submission:


Take your UPSC photo with a phone
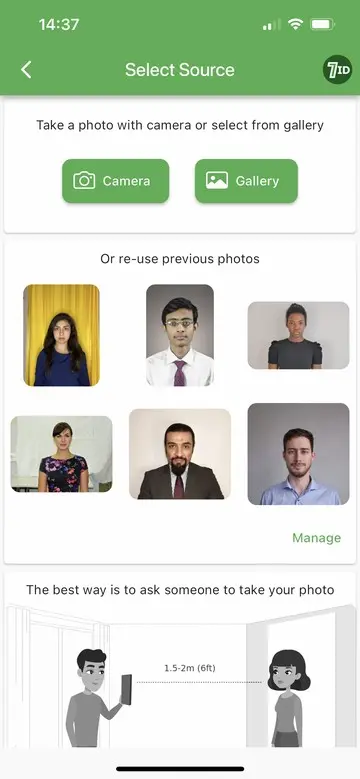
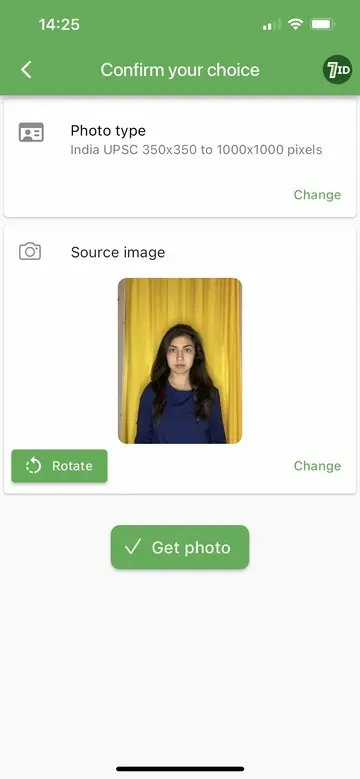
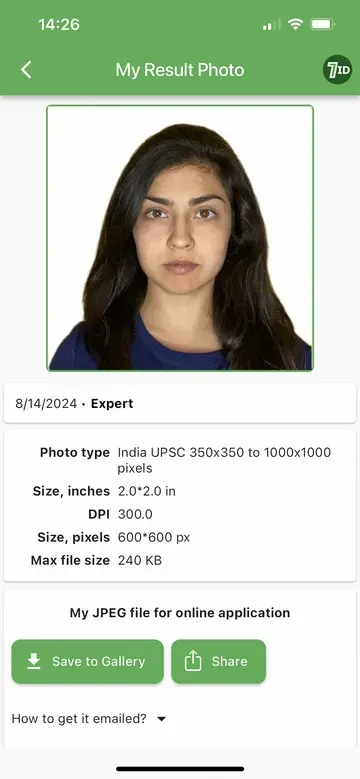
The 7ID app by Visafoto.com makes it easy to edit and store ID photos directly on your phone. Simply take a selfie following the provided guidelines, upload it to 7ID, and the app will handle the rest by adjusting the format and background as needed.
Your processed photos, along with your signature image, will be saved conveniently on your device.
How to upload your Photo and Signature to your UPCS form
Use the “Photo & Signature Upload” Module of the second part of your form.
First, press the Upload Photograph button to upload your photo, and then press the Upload Signature button to upload your signature. After you upload your signature and photo, a fresh page opens. In the preview your signature is seen along with your photo. The photo is in the upper row and the signature is in the lower row. Pay attention that your photo is above your signature. If you reverse them, this will lead to complications.
You must check the quality of your signature and photo. If you do not like the quality of your signature, press the Reload Signature button. Then press the Image refresh button, and you will see your new Signature. Do you dislike your signature again? Then upload a new one. You can upload as many different signatures as you want, there is no limit for that. If you do not like the quality of your photo either, change it using the Reload Photograph button.
Only when you are satisfied with the uploaded photo and signature, press the Confirm Upload button. After that, you will not be able to change either photo or signature. Remember that without pressing the Confirm Upload button neither your photo or signature will be saved in your form.
Candidates have a full responsibility for their signatures and photos. Remember that if your signature or your photo does not have a correct format or has a poor quality, your whole application can be rejected by the commission. It is an official warning of the UPSC. Also if you upload a wrong signature or a wrong photo, your candidature may be canceled for false identity. So it is better to have your signature and photo done with a professional service than make it manually in paint.
When you finish, double check the information as after submitting the form, you will not be able to modify it. Print out of the submitted Online Recruitment Application and keep it for your examination. Check out your e-Admit Card too, and report if there are any problems with it.
Good luck with your examination.
