India Visa Status Check and Validity: How to Track and Verify Your Indian Visa Online

Before travelling to India, it is essential to confirm that your visa is valid and active. The Indian government provides online systems that make it easy to verify the status and validity of your e-Visa, sticker visa, or OCI card in minutes. This guide explains how to safely and accurately check your India visa application status.
Table of contents
- Overview of India’s visa system (e-Visa, regular sticker visa, OCI, etc.)
- Where to check your India visa status
- Step-by-step guide to check your Indian e-Visa status
- Checking regular (sticker) visa validity
- Understanding visa validity and duration of stay
- How to track India’s visa expiry or remaining validity
- What to do if your visa status changes
- Photo requirements for an Indian visa
- India Visa Photo Editor
- India Visa Photo App
- What to do if your visa expires during your stay?
- FAQ
Overview of India’s visa system (e-Visa, regular sticker visa, OCI, etc.)
India's visa system offers several options, including e-Visas, regular sticker visas, and Overseas Citizen of India (OCI) status, each designed for specific needs and eligibility.
E-Visa
The e-Visa simplifies travel for citizens of 172 countries and features 13 sub-categories, including e-Tourist, e-Business, and e-Medical visas, among others. This process is entirely digital, with approved e-Visas electronically linked to the applicant's passport, ensuring a seamless entry experience. According to Atlys, a permit processing platform, e-Visas accounted for 82% of all visa applications in India in 2025, up from 79% in 2024. This shows a clear preference for digital processes among travellers.
Regular sticker visa
For travellers whose visits don't qualify for the e-Visa, or whose countries aren't eligible, the regular sticker visa is available. This requires a more traditional application approach: submit an online application, present documents and biometrics in person at an embassy, consulate, or Visa Application Centre (VAC), and then retrieve your passport with the entry permit stamped inside.
Overseas Citizen of India (OCI)
OCI status grants foreign nationals of Indian descent near-citizen privileges, enabling unlimited entries and stays without the need for repeated registration with the FRRO. OCI holders can work, study, invest, and own property in India, although they can't vote or purchase agricultural land. Obtaining an OCI card involves providing documentation on Indian heritage, and it's refreshed with each passport renewal.
Where to check your India visa status
Checking the status of your India visa application is straightforward and convenient with online resources. Depending on your entry document type, you'll use different official government channels. For e-Visas, visit the Indian government's dedicated e-Visa Portal. If you applied for a regular sticker visa, use the Visa Enquiry feature found on the main Indian visa website or check the website of the specific Indian embassy or consulate involved.
Step-by-step guide to check your Indian e-Visa status
Checking your Indian e-Visa status online takes only a few minutes when you know where to look and what information to provide. Here’s a detailed walkthrough to help you confirm whether your e-Visa has been approved or is still being processed:
- Go to the official India e-Visa portal.
- Click on "Check Visa Status". Enter your Application ID and Passport Number to see your current status, whether it’s Granted, In Process, Rejected, or requires more information.
- The website will email you when your e-Visa is approved or if further documents are necessary. Upon approval, you'll get a PDF of your ETA.
- Download and print your ETA to carry during your travel to India.
Checking regular (sticker) visa validity
For those with a traditional visa sticker in their passport, confirming its validity before your travel is crucial. Since there’s no single online portal for validating a physical visa sticker post-issuance, here's how to ensure your compliance:
- Examine your visa sticker. Look at the sticker in your passport for the "Date of Issue" and "Date of Expiry." Your travel must fall within these dates.
- Entry and Stay type. Check the “Entries” section (Single, Double, or Multiple) to know how many times you can enter India. The “Stay allowed” detail indicates maximum duration per visit.
- Category-specific limits. Be aware of any annual limitations - tourist and business visas might restrict the total days you can stay per year (often capped at 180 days), irrespective of the printed validity period.
- If you encounter discrepancies or have multiple prior entries, consult your issuing embassy or consulate. Alternatively, use the Visa Enquiry section on the Indian visa website for guidance.
Understanding visa validity and duration of stay
Visa validity and duration of stay are two related but distinct concepts in the Indian visa system. Knowing the difference between these two terms helps avoid unintentional overstays.
Visa validity
Visa validity refers to the period during which you can enter India. This period starts on the date your entry permit is issued and ends on the expiry date printed on your visa or ETA. Depending on the type of permit and your nationality, validity can range from 30 days to 10 years. During this period, your visa might allow single, double, or multiple entries, as specified.
Duration of stay
This term defines how long you can stay in India per visit, independent of your visa’s overall validity. For example, a 30-day e-Tourist visa allows a maximum stay of 30 days per visit. A 1-year tourist visa typically permits stays of up to 90 days per visit, constrained to a total of 180 days in a calendar year. Business and medical visas may allow stays of up to 180 days per visit. Exceeding the allowed stay might require registration with the Foreigners Regional Registration Office (FRRO) within 14 days past the 180-day mark.
In essence, visa validity determines when you can enter India, while the duration of stay limits how long you can remain on each visit.
How to track India’s visa expiry or remaining validity
Keeping track of your Indian visa’s expiration date ensures you stay compliant with immigration laws. You can calculate your remaining validity manually or by using online tools provided by the Indian government.
For e-Visa:
The e-Visa validity starts from the day your ETA is approved, not from the application date. Validity periods can vary:
- An Indian e-Tourist visa validity period may be for 30 days, 1 year, or up to 5 years with multiple entries. Each visit should not exceed 90 days. However, for US, UK, Canada, and Japan nationals, it can be up to 180 days.
- The Indian e-Business visa is valid for 1 year (365 days). Each stay can last up to 180 days. You can enter multiple times within the one-year validity period.
To check your India visa ETA status and its expiry, visit the e-Visa portal and select the 'Check Visa Status' option, entering your application ID and passport number. Your ETA document, sent via email upon entry document approval, includes details of your permit’s validity and stay duration. Keep it as proof.
For regular sticker visa:
Your visa sticker displays its issue and expiry dates, along with the number of allowed entries, defining your permit validity. It also specifies your allowed duration per visit. There’s no direct online tool for automatically tracking sticker visa expiry post-issuance. You need to manually track the expiry date as per your passport.
For updates on application status or expiring visas, visit the Indian Visa Status Enquiry page or contact the issuing embassy or consulate.
What to do if your visa status changes
If your application status changes - whether approved, pending, or rejected - it’s essential to understand what the update means and how to respond. Prompt action can help you avoid delays or travel disruptions.
For e-Visa status changes:
- Approved. Print out the ETA email and keep it with your passport. Use it to travel within the specified validity and stay duration.
- Rejected or pending. Follow the instructions in the email notification. If additional documents are needed, upload them promptly through the e-Visa portal. For rejected applications, review the reasons, and if eligible, consider reapplying or contacting support for assistance.
- Additional info required. Check your email for detailed instructions on what’s missing or incorrect, and upload the necessary documents through the “Upload Documents” section on the portal.
For regular (sticker) visa status changes:
- Approved. Retrieve your passport with the visa stamp from the Visa Application Centre, consulate, or embassy as instructed.
- Rejected. Examine the reasons provided in the decision letter. Prepare to reapply with corrected or added documents if eligible. Contact the issuing authority for clarification or appeal options if necessary.
- Lost or damaged visa. If your passport with the visa is lost, report it to the police, notify the consulate, and follow their guidance to secure a new visa.
- Change in personal details. If there's a change in personal details like name or nationality that differs from what's on your visa, you must apply for a new visa. A visa with outdated information cannot be used for travel.
For changes due to health, marriage, or other reasons requiring a different visa type or an extension, apply through the Foreigners Regional Registration Office (FRRO). Visit FRRO Online for details on conversion, extension, or exit permissions.
Photo requirements for an Indian visa
Your photo plays a crucial role in the Indian visa application process, as incorrect specifications often lead to rejections. Meeting the following official size, background, and quality standards ensures smooth approval of your entry document request:
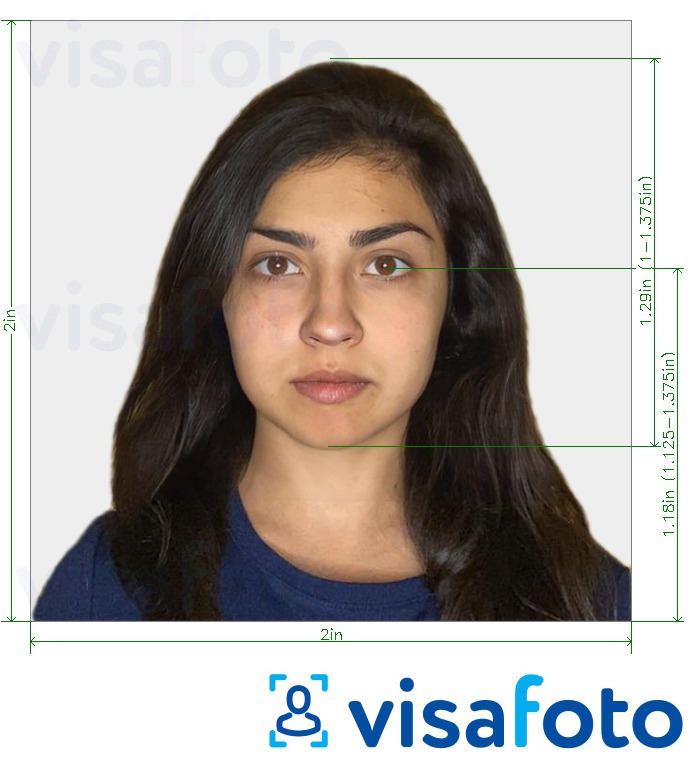
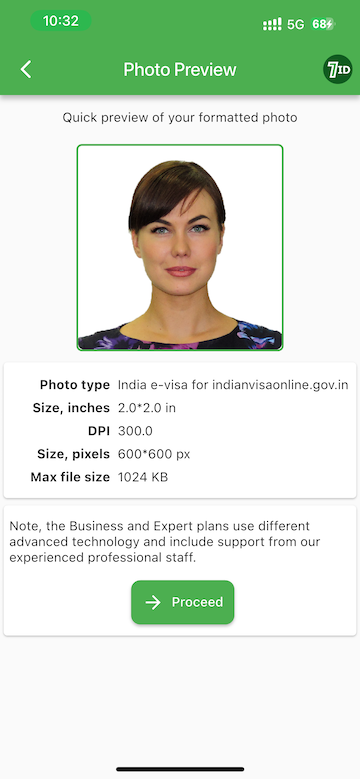
- Depending on the consulate, the photo size generally should be 5×5 cm (2×2 inches) or 35×45 mm. Always check specific guidelines for the mission.
- Digital sizes are as follows: Submit in JPEG format. The minimum dimensions are 350×350 pixels, and the maximum is 1000×1000 pixels. File size must be between 10 KB and 1 MB.
- The photo must be in colour.
- The head should fill 70-80% of the photo, measuring 25-35 mm. It must be centred, showing the full face from the top of the hair to the chin.
- Face should be straight with visible ears and neck. Maintain a neutral expression with eyes open and mouth closed.
- The background must be plain white or light-coloured without any shadows.
- Glasses with thin frames are allowed if there’s no glare. Tinted glasses and sunglasses are not permitted.
- Head coverings are allowed for religious reasons, but facial features must be visible.
- The photo must be less than six months old and a true representation of you on the application day.
Here is a photo example:
India Visa Photo Editor
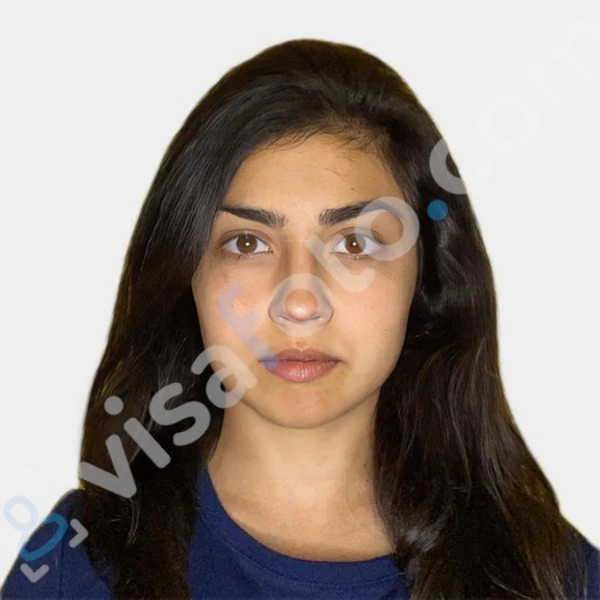
Looking for a photo that meets all the requirements for an Indian visa? Use professional online tools such as Visafoto.com. Visafoto has been processing document pictures since 2013 and knows the requirements for every single passport, visa, driving licence, or any other document worldwide.
To get started, take a well-lit photo of yourself and upload it to Visafoto. No worries about the format, background, sizes, and dimensions - we’ll handle that for you.
The photo should look like this:

You'll receive both a digital copy for online applications and a print-ready version. If you're not satisfied with the result, we offer a free replacement. If authorities reject the photo, you'll receive a full refund.
India Visa Photo App
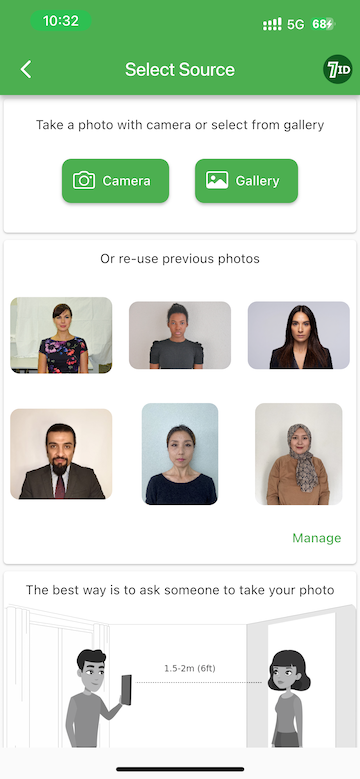
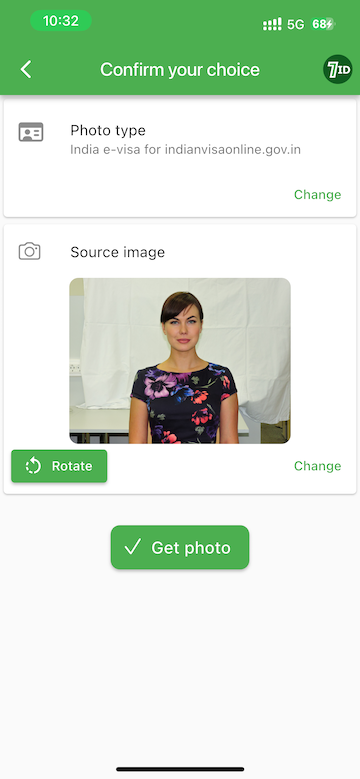
Prefer handling everything from your phone? Try the 7ID app by Visafoto.com. This user-friendly app is designed to simplify the process of creating ID, passport, and visa photos using your smartphone. The app is compatible with both iPhone and Android devices.
Here’s how it works:
- Upload your photo to the 7ID app.
- Select India as a country and “visa” as a document type.
- The app will automatically adjust everything - size, format, background, and facial alignment - to fit official standards.
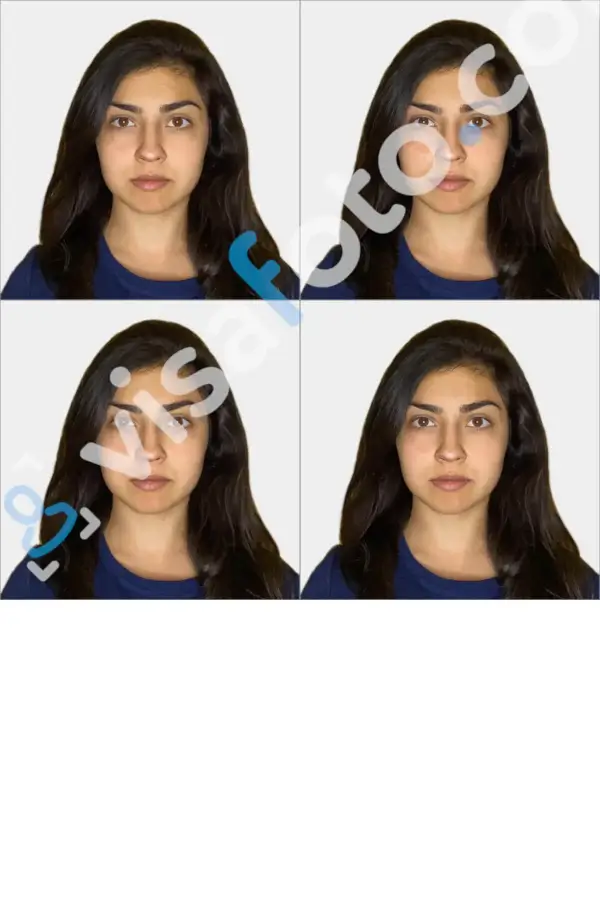
You'll get:
- A digital image ready for submission.
- A print template compatible with standard paper sizes like 4×6, A4, A5, or B5.
For any inquiries or assistance, our technical support is available around the clock to help.
What to do if your visa expires during your stay?
If your Indian visa expires while you are still in the country, you must take immediate steps to regularise your stay. Depending on your situation, this may involve applying for an extension or contacting the nearest FRRO office. Here's what you need to do:
- Report to the FRRO or FRO. Head straight to the nearest Foreigners Regional Registration Office (FRRO) or Foreigners Registration Office (FRO) as soon as you realise your visa has expired. You can also use the e-FRRO online portal. Reporting voluntarily can help minimise penalties.
- Prepare necessary documents. Be ready to explain why you overstayed. Gather supporting documents such as proof of emergencies, flight cancellations, or medical issues.
- Request an exit permit or a visa extension from the FRRO. Extensions are rare and usually only granted in cases of medical emergencies, flight cancellations, or other unavoidable situations.
- Pay overstay penalties. Overstaying incurs fines that scale with the duration of your overstay:
- Up to 15 days: You might not be fined.
- 16 to 30 days: ₹10,000.
- 31 to 90 days: ₹20,000.
- Over 90 days: ₹50,000 or more, with the risk of detention.
Consequences of overstaying:
- Serious or lengthy overstays can lead to deportation and blacklisting, which might prevent you from returning to India for several years or permanently.
- Overstaying is a criminal offence under the Immigration and Foreigners Act, 2025, and may result in up to three years in prison and costly fines.
- Even short overstays can cause problems obtaining future Indian entry documents, as you'll be flagged as non-compliant by immigration authorities.
FAQ
How long does it take to process an Indian visa?
The time it takes to process an Indian visa varies by type:
- E-Visa: Generally takes up to 72 hours (3 days) after submission. It may take longer if you need additional documents.
- Regular sticker visa: Usually requires 3–5 working days once the Indian Mission or Visa Application Centre receives your complete application.
- OCI (Overseas Citizen of India): Typically takes 5 to 6 weeks following registration.
How can I check the status of my India e-visa if I lost my application number?
You need both your application ID and passport number for your Indian e-visa tracking. If you can't find your application number, search your email for the confirmation from the official e-visa portal, or reach out to e-visa support via email or helpline for help.
Is it possible to change my visa type after approval?
Once approved, changing your visa type is generally not permitted, especially for e-Visas, as the type is specific. Exceptions, like Employment Visas, may allow changes with prior approval from the Ministry of Home Affairs, but these require a formal application via FRRO or Foreigners Regional Registration Office.
Can I extend my e-visa while in India?
You cannot extend an e-Visa while inside the country, as they are non-extendable and non-convertible. To stay longer, you typically need to leave India and apply for a new visa. However, you can apply to convert your e-Visa into an Entry (X) Visa for specific reasons, such as family reunification. This requires application through the FRRO portal.
What should I do if my visa is rejected?
If your Indian visa is rejected, follow these steps:
- Read the refusal notice carefully to understand why your visa was denied.
- Strengthen your application by addressing the reasons for refusal. This may involve submitting updated documents, providing clearer travel plans, or offering stronger evidence of ties to your home country.
- Reapply with these improvements.
Last updated: 2025-11-05